| Home » Categories » LandMagic » Applications » Harvesting |
Ticket Entry |
|
Article Number: 1047 | Rating: Unrated | Last Updated: Jul 22, 2015 at 10:27 AM
|
|
Objectives
• Understand how to create a new ticket
• Understand how to create a split ticket
• Understand editing a ticket
• Understand Land Creation
• Understand Contractors Rates Tab
• Understand the Ticket Test results tab
Harvesting ticket screen Overview
The Harvesting ticket screen is used to enter new tickets for fruit harvested.
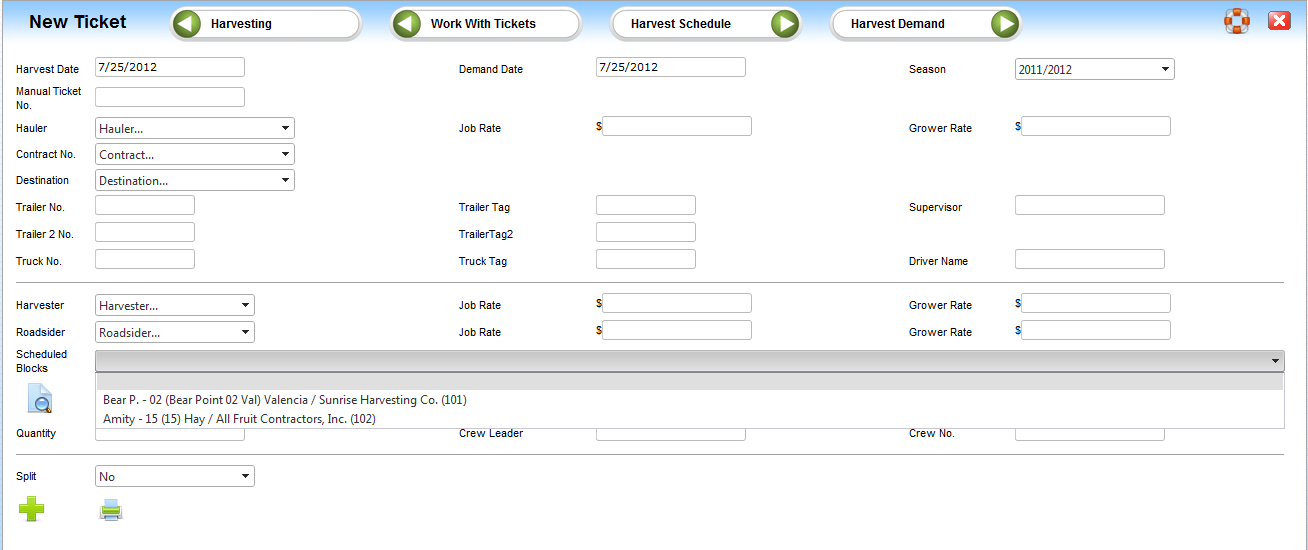
New ticket screen with scheduled blocks
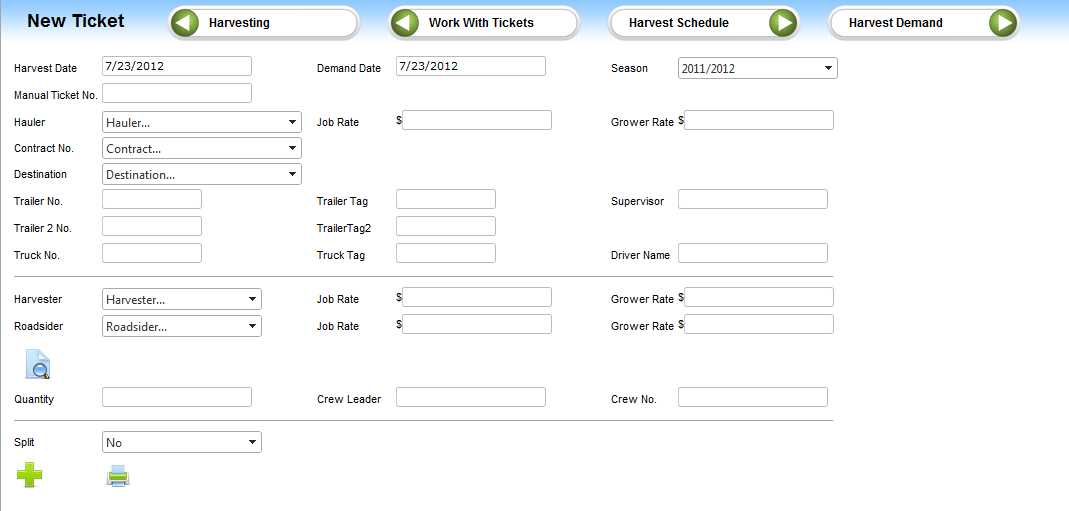
New ticket screen without scheduled blocks
Entering a new ticket
1. Harvest date: System will default to current date. The date can be changed by using the drop down calendar or typing the date information (mm/dd/yyyy)
2. Demand Date: If there is a demand associated with the new ticked enter the date
3. Season: Season will default to current season
4. Manual Ticket No.: Required field, If system is setup for Manual Ticket number. Enter the ticket number
5. Hauler: Select the Hauler information
6. Job Rate: Enter a Job rate if tracked. The Job rate can be defaulted to appear when a Hauler is selected. Please refer to “Work with Contractors” for more information
7. Grower Rate: Enter a Growers rate if tracked. The Growers rate can be defaulted to appear when a Hauler is selected. Please refer to “Work with Contractors” for more information
8. Contract No.: Select the Contract no. for this ticket
9. Destination: Required field, Select the destination
10. Trailer No: Required field, Enter Trailer number
11. Trailer Tag: Enter Trailer tag number
12. Supervisor: Enter Supervisor name
13. Trailer 2 No.: Enter trailer number 2 number (if applicable)
14. Trailer 2 Tag: Enter trailer number 2 tag number (if applicable)
15. Truck No.: Enter truck number
16. Truck Tag: Enter truck tag number
17. Driver Name: Enter Driver’s name
18. Harvester: Required field, Select Harvester information
19. Job Rate: Enter a Job rate if tracked. The Job rate can be defaulted to appear when a Hauler is selected. Please refer to “Work with Contractors” for more information
20. Grower Rate: Enter a Growers rate if tracked. The Growers rate can be defaulted to appear when a Hauler is selected. Please refer to “Work with Contractors” for more information
21. Roadsider: Select Roadsider information
22. Job Rate: Enter a Job rate if tracked. The Job rate can be defaulted to appear when a Hauler is selected. Please refer to “Work with Contractors” for more information
23. Grower Rate: Enter a Growers rate if tracked. The Growers rate can be defaulted to appear when a Hauler is selected. Please refer to “Work with Contractors” for more information.
24. Scheduled Blocks: If any blocks have been schedule to be harvested for the date selected the Schedules Blocks field will appear. Using the drop down list you are able to select the block harvested for the ticket. If no blocks have been scheduled utilize the Block Pick field
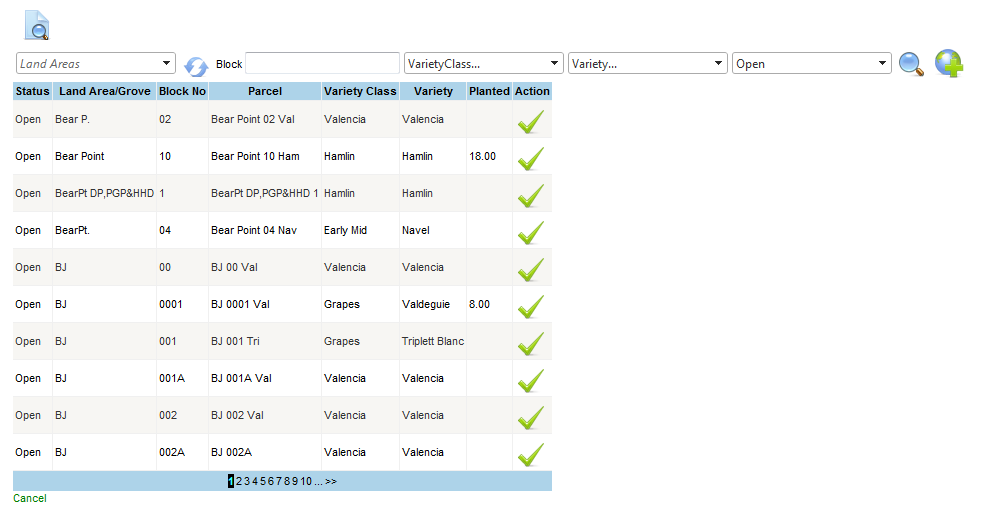
25. Block Pick: Required field, select the Block(s) being harvested.
When you are ready to select block(s) harvested click block pick. A list of blocks will appear. You can use the filter fields to view only land areas, blocks varieties as needed. Click the check mark under action to select block harvested. If the block harvested is not listed you can create a Land on the fly. See section Land Creation for further information.
26. Quantity: Required field, Enter quantity harvested
27. Crew Leader: Enter Crew leader
28. Crew No.: Enter Crew number
29. Split Ticket: Select yes if this ticket is a split ticket. If split ticket in no click insert to save the ticket
Creating a split ticket
When creating a harvesting ticket select yes in the Split field. The system will display
Previously enter data and ticket number.
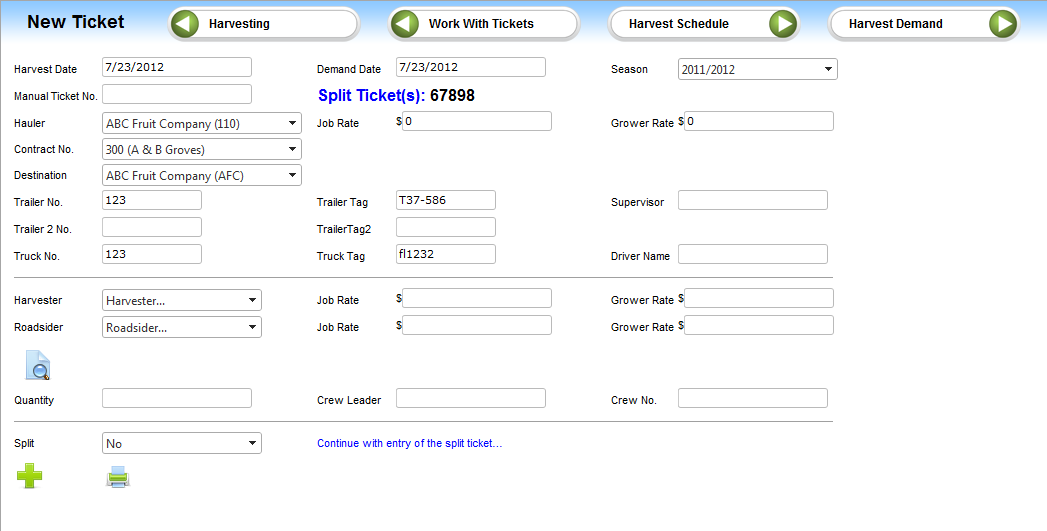
1. Select Harvester: Required field, Select Harvester information
2. Job Rate: Enter a Job rate if tracked. The Job rate can be defaulted to appear when a Hauler is selected.
3. Grower Rate: Enter a Growers rate if tracked. The Growers rate can be defaulted to appear when a Hauler is selected.
4. Roadsider: Select Roadsider information
5. Job Rate: Enter a Job rate if tracked. The Job rate can be defaulted to appear when a Hauler is selected. Please refer to “Work with Contractors” for more information
6. Grower Rate: Enter a Growers rate if tracked. The Growers rate can be defaulted to appear when a Hauler is selected. Please refer to “Work with Contractors” for more information
7. Select Block: Required field, select the Block(s) being harvested.
8. Enter Quantity:
9. Crew Leader: Enter Crew leader
10. Crew No.: Enter Crew number
11. Click insert when complete
Land Creation
In the Block pick screen if a land block is not listed you are able to create a land block on the fly. To create a Block on the fly, click the Land Creation button from the Block Pick area.
 Click the Land Creation icon Click the Land Creation icon
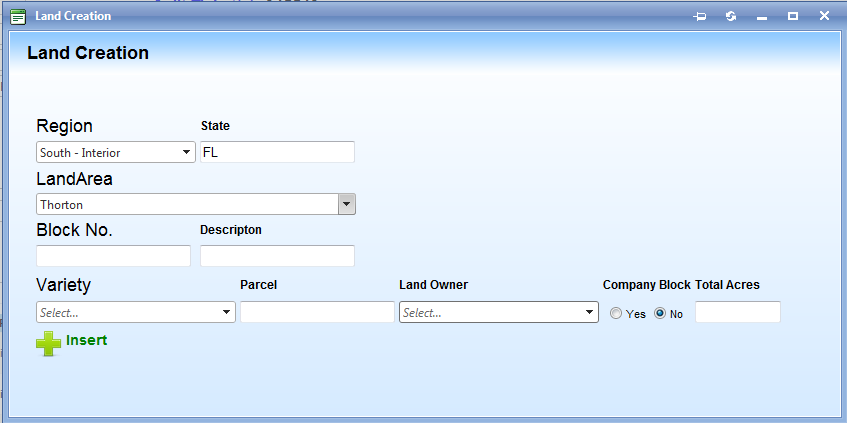
In the Land Creation enter
1. Select the region
2. State will automatically be populated
3. Select Land Area
4. Enter a Block Number
5. Enter a Block Description
6. Select Variety
7. Click in Parcel field, parcel will be populated
8. Select Land Owner
9. Select yes or no regarding Company Block
10. Enter Total Acres
11. Click Insert
Your new land can now be selected as a block harvested.
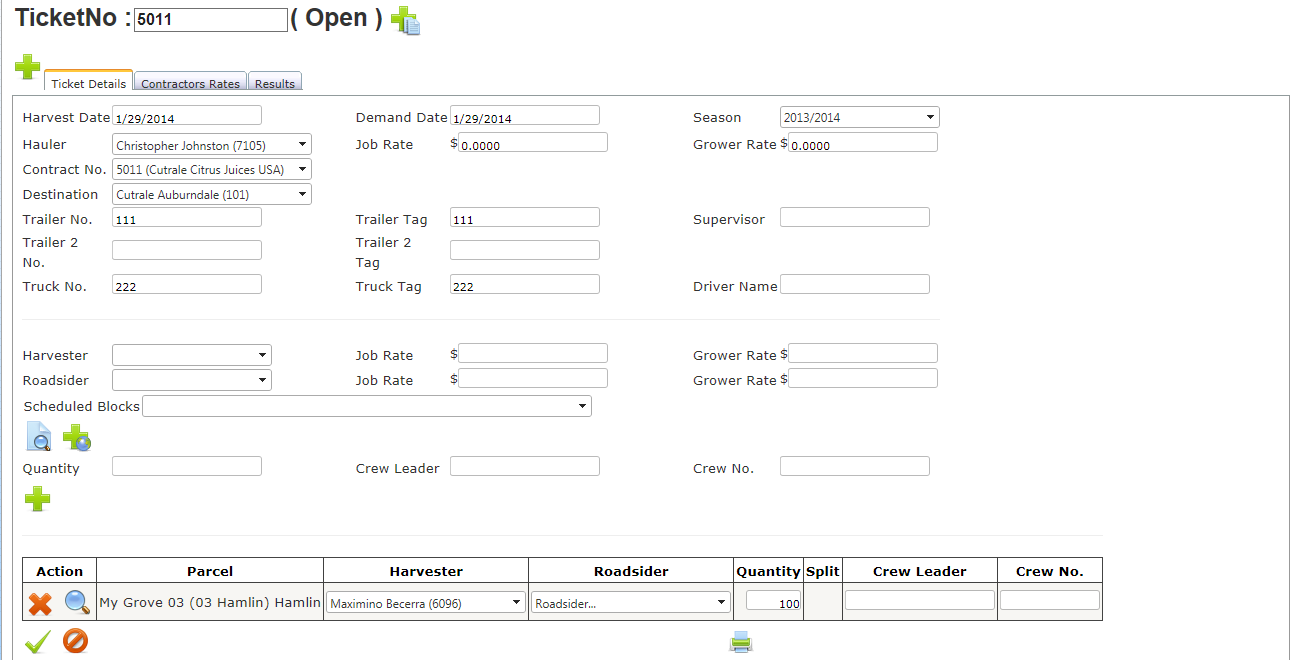
Editing a ticket
Clicking on a ticket number will display the ticket information and allow you to view and make edits.
Contractors Tab
The Contractors tab lists the default rates setup in the Work with Contractors screen. Please refer to “Work with Contractors” for more information. You can edit the rates for a particular ticket without affecting the defaults rates. You can add an additional contractor if needed. (A second roadsider…)

(Test) Results tab
The Results tab will display test results either downloaded from CitraNet or manually entered. Please refer to “CitraNet Test Results” for more information. To manually enter the test results change Results/CitraNet selection to No and enter your information click submit to save.
 |
Posted - Jun 4, 2015 at 12:20 PM Filed Under: Harvesting |
Attachments  There are no attachments for this article. | Related Articles 
CitraNet Viewer (WIP)
Added on Aug 4, 2015
Harvest Schedule
Added on May 29, 2015
Work With Tickets
Added on Jun 4, 2015
Ticket Exchange (WIP)
Added on Aug 4, 2015
Harvest Demand
Added on May 27, 2015
Pre-Ticket Entry
Added on Jun 5, 2015
Estimates
Added on May 8, 2015
|
|


