| Home » Categories » LandMagic » Applications » Harvesting |
Harvest Schedule |
|
Article Number: 1045 | Rating: Unrated | Last Updated: Jun 30, 2015 at 2:24 PM
|
|
Schedule Overview
Objectives
• Understand The Schedule screen
• Understand the Fruit Purchase screen
• Understand how to create a new schedule
• Understand how to create a new purchased fruit schedule
Overview
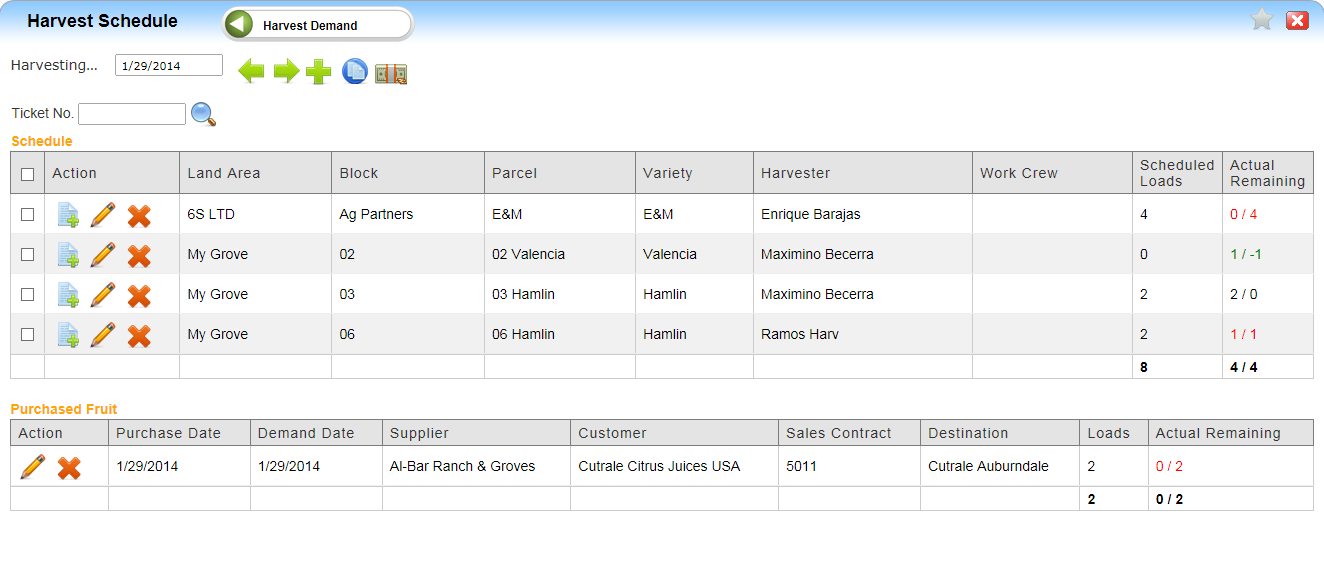
The Schedule screen lists all groves scheduled to be harvested for the date selected. It also tracks loads completed and remaining loads. From the schedule page you may also copy scheduled loads to another date to complete a request.
Harvesting Schedule screen:

Navigation buttons
 - Used to change dates. You may enter the date or use the arrows to move the dates forward or back. - Used to change dates. You may enter the date or use the arrows to move the dates forward or back.
 Add a new schedule Add a new schedule
 Copy a schedule(s) to another date. To copy a schedule place a check mark in the box to the left of the Action column for the scheduled loads you want to copy over. Copy a schedule(s) to another date. To copy a schedule place a check mark in the box to the left of the Action column for the scheduled loads you want to copy over.
 Enter a Purchased Fruit schedule Enter a Purchased Fruit schedule
Understand the Harvest Screen
Column definitions:
- Action: Create a new ticket, edit schedule and delete schedule
- Land Area/Grove: Scheduled land area/Grove to be harvested
- Block: Scheduled Block to be harvested
- Variety: Variety scheduled to be harvested
- Harvester: Harvester assigned to harvest this schedule
- Work Crew: Work crew assigned to harvest this schedule
- Scheduled Loads: Number of loads scheduled to be harvested
- Actual Remaining: Actual loads harvested and loads remaining
Purchased Fruit Section
Purchased fruit lists fruit you have purchased from a grower and selling to a customer.

Column definitions:
- Action: Edit and delete schedule
- Purchase Date: Date fruit was purchased
- Demand Date: Date fruit is needed by
- Supplier: Grove owner/Supplier fruit was purchased from
- Customer: Customer fruit is sold to
- Sales Contract: Sales contract number for fruit purchased
- Destination: Destination fruit is to be delivered
- Loads: Number of loads of fruit to be purchased
- Actual/Remaining: Actual loads purchased and loads remaining
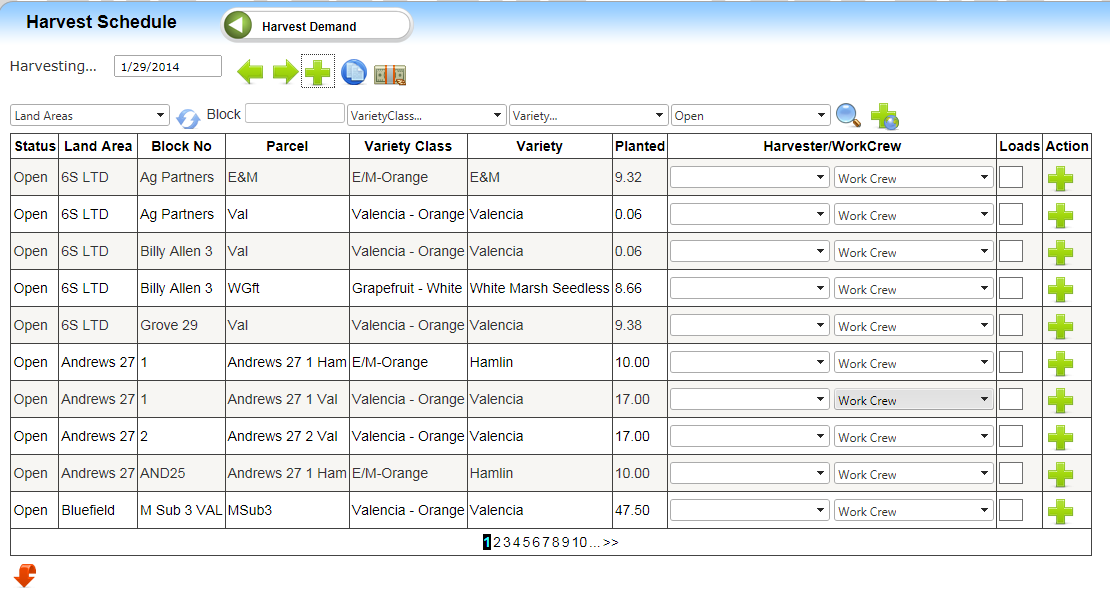
New schedule screen
To create a new schedule, click the Plus icon.
Use the Filters supplied to limit the data you wish to display - Land Area, Block, Variety Class, Variety and Status.

Creating a new schedule
1. Select the harvester in the Land Area/Grove you are scheduling
2. Select the work crew if tracked. Not required
3. Enter the number of loads to be schedule
4. Click the plus icon in the action column to save the schedule
Creating a new Purchased Fruit schedule
The Purchased fruit lists fruit you have purchased from a grower and selling to a customer.
Clicking on the Fruit Purchase icon will display the purchase input screen

1. Select supplier
2. Select customer
3. Select Sales contract
4. Select Destination
5. Enter Quantity / number of loads to be purchased
6. Enter Purchase Date
7. Enter Demand date
8. Click Submit |
Posted - May 29, 2015 at 10:32 AM Filed Under: Harvesting |
Attachments  There are no attachments for this article. | Related Articles 
Harvest Demand
Added on May 27, 2015
Estimates
Added on May 8, 2015
Work With Tickets
Added on Jun 4, 2015
Ticket Exchange (WIP)
Added on Aug 4, 2015
Ticket Entry
Added on Jun 4, 2015
Pre-Ticket Entry
Added on Jun 5, 2015
CitraNet Viewer (WIP)
Added on Aug 4, 2015
|
|


